Here is the original document from Oracle but I have added a little more steps to help clarify the setup.
Original Instructions
All of the REST APIs, except for the navigations REST API, require WebCenter Spaces. For information on the navigation REST API, see Section 13.3.2, "Using the Navigation REST APIs."
51.2.1 Introduction
Before you can use the WebCenter REST APIs, you must perform the server-side configurations described in this section. You must perform two separate configurations. You must configure an identity asserter and you must seed required entries in the credential store, which enables the REST security tokens to function properly.
Perform these configuration tasks when WebCenter Spaces is installed for the first time or if you otherwise know the configuration tasks have not been previously performed.
For more information on security tokens, see Section 51.9, "Security Considerations for WebCenter REST APIs."
Note:
This configuration is not required for the navigation REST APIs or for the CMIS REST APIs.
51.2.2 Configuring an Identity Asserter
First, you must configure an identity asserter before using the REST APIs. For detailed instructions, see "Configuring the REST Service" in the Oracle Fusion Middleware Administrator's Guide for Oracle WebCenter.
Here the start use your own admin password do not change anything even the copied instructions use verbatium.
First do this to see it not working in a browser hit the url localhost:8888/rest/api/resourceIndex put in you userid:youruserid and password yourpassword
Now after all this you will see all the xml just follow the steps.
WebCenter Domain Keystore
- Go to JDK_HOME
/jdk/bin
- RUN THIS COMMAND: keytool -genkeypair -keyalg RSA -dname "cn=spaces,dc=example,dc=com" -alias orakey -keypass welcome1 -keystore default-keystore.jks -storepass welcome1 -validity 1064
- RUN THIS COMMAND:keytool -exportcert -v -alias orakey -keystore default-keystore.jks -storepass password -rfc -file orakey.cer
- RUN THIS COMMAND keytool -importcert -alias webcenter_spaces_ws -file orakey.cer -keystore default-keystore.jks -storepass yourpassword
- Ensure that the
default-keystore.jks keystore file is copied to the <DOMAIN_HOME>/config/fmwconfig directory, and then specify the location as ./default-keystore.jks.
- Open Fusion Middleware Control and log in to the WebCenter domain.
- In the Navigation pane, expand the WebLogic Domain node and click the WebCenter domain (
wc_domain by default).
- From the WebLogic Domain menu, select Security -> Security Provider Configuration.
- Expand the Keystore section on the Security Provider Configuration page
- Click Configure
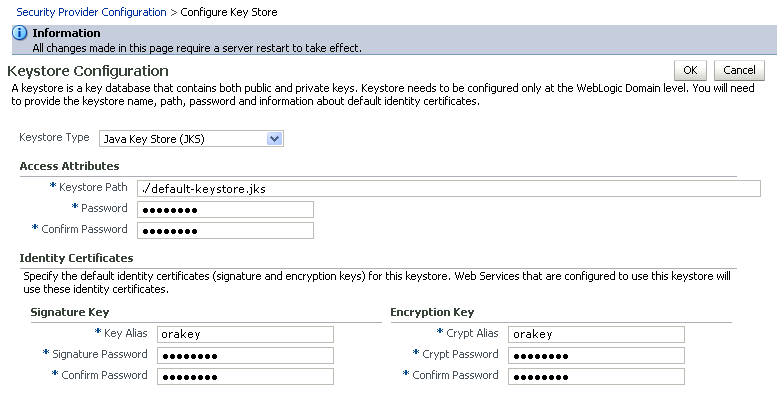
Description of "Figure 32-4 Keystore Configuration Page"
11. Use the following settings to specify the location of the keystore that contains the certificate and private key, and the signature key and encryption key aliases:
- Keystore Path:
- Password
- Key Alias: orakey
- Signature Password
- Crypt Alias: orakey
- Crypt Password
12. Click OK to save your settings.
13. Restart the Administration server for the domain.
28.8.3 Configuring the WLS Trust Service Asserter
This section describes how to configure the WebLogic Server Trust Service asserter.
To configure the WebLogic Server Trust Service asserter:
The Create a New Authentication Provider page displays.
- Enter the Name of the new asserter (for example,
TrustServiceIdAsserter).
- Select
TrustServiceIdentityAsserter
This asserter calls the Trust Service APIs to decode and validate the token from the incoming request, and pass the username to the WebLogic for establishing the asserted subject.
- REBOOT everything again
NOW RUN THESE wlst:
wlst.cmd in the ECM directory common/bin
connect(‘userid’,’password’, ‘localhost:7001’)
createCred(map="o.webcenter.jf.csf.map", key="keygen.algorithm",
user="keygen.algorithm", password="AES")
THIS ONE told me it already exsisted after running it no harm no foul it worked
createCred(map="o.webcenter.jf.csf.map", key="cipher.transformation",
user="cipher.transformation", password="AES/CBC/PKCS5Padding")
OK you are done lets test it out :-)
In a browser hit the url localhost:8888/rest/api/resourceIndex put in you userid:myuserid and password yourpassword when prompted by browser.
Try the RestConsole for chrome
 oracle webcenter portal | in
  WebCenter
